Posts Tagged '#itswhatsfordinner'

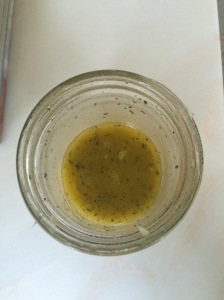
Lemon Vinaigrette

I’ve been making salads like crazy the last couple of weeks. Maybe because its January or because its gray and foggy almost constantly where I live and a big plate of crunchy veggies somehow makes me think of spring. Ok, let’s be real, it’s January and I could use a few more salads and a whole lot less of just about everything else.

I discovered caramelizing sweet onions ahead of time, saving them in the fridge to use throughout the week, after reading Shauna Niequist’s, Bread and Wine and now I can’t get enough.  They are so good in a salad, and now I feel like I HAVE to have them all the time.

Anyway, this blog isn’t really about onions, it’s actually about the salad dressing. My friend gave me the recipe to a lovely lemon vinaigrette that is bright and acidic, a tiny bit sweet and perfect over greens, veggies and a little goat cheese or feta  (and don’t forget the onions)!

I think the original recipe is from Betty Crocker and as I almost always do, I improvised a little based on what I had. It’s hands down my favorite dressing right now.

109

Lemon Vinaigrette

  • 1/2 cup extra virgin olive oil
  • the juice of one lemon (between 1/4-1/3 cup)
  • 1 tablespoon red wine vinegar
  • 2 teaspoons sugar
  • 1/2 teaspoon salt
  • 1/2 teaspoon ground pepper
  • 1/2 teaspoon Dijon mustard
  • 1/2 teaspoon dried parsley
  • a splash of Worcestershire sauce
  • 1 clove garlic, finely chopped

Combine all the ingredients in a jar with a lid. Shake it up until well combined and store in the fridge for a couple of days.

My favorite salad:

  • baby spinach
  • carrots
  • English cucumber
  • red pepper
  • goat cheese
  • sunflower seeds
  • garlic croutons
  • caramelized onions
  • grilled chicken or turkey deli meat

To make the onions, slice up two large walla walla sweet onions. Heat a cast iron pan over medium heat with 1/2 tablespoon butter and a tiny splash of olive oil. The key with onions is low and slow. As they begin to soften and change color, lower the heat a little and stir often. Salt them halfway through. When they are a nice caramel color, take them off the heat and let them cool. Store in the refrigerator to use all week-long.
Kitchen Captivated

I think I’ve professed my love for cooking and eating enough times on this blog that you all know that I like to…well…cook and eat. All that cooking and eating opened a fun little door and I’m now writing a regular column for a local magazine in my hometown. It’s small potatoes for sure, but it’s a fun project for me that I’m really excited about.

My first column was published a couple of weeks ago and I wrote about my newish obsession with grilling pizza. Seriously, it’s the best.

So, if you have a minute, check out my column here and the next time you’re in the mood for pizza, try this recipe:

080

Pizza Dough

  • 1 cup warm water
  • 1 ½ tablespoons honey
  • 2 tablespoons olive oil
  • 1 ½ teaspoons salt
  • 2 2/3 cup bread flour
  • ½ cup whole wheat pastry flour (can be swapped for bread flour)
  • 2 teaspoons dry active yeast (or one packet of yeast)

Combine flour and salt in a small bowl. In a separate bowl, dissolve yeast in water. Let stand for a few minutes while the yeast activates. The yeast is ready when it gets frothy and bubbly. Add dry ingredients, oil and honey. Stir the dough until ingredients combine, then knead on lightly floured board until smooth and elastic (about 8-10 minutes). Form the dough into a ball and place in a greased bowl. Cover the bowl and let rise until doubled in size (about an hour).  Divide the dough in half and using a rolling-pin, form the dough into two 12-inch circles.

My most favorite toppings are simply garden tomatoes, fresh basil, a little garlic and mozzarella. Nothing beats that combination and on the grill, the tomatoes soften and roast perfectly.

To cook your pizza, heat your barbecue to 500 degrees. Use a pizza stone or pizza pan to cook your pizza. You can use a cookie sheet, but it doesn’t work as well. You can also cook your pizza directly on the grill. Simply place your rolled-out dough directly on the grill, cook on one side for about 2 to 3 minutes, flip, add your toppings and finish cooking for an additional 5 to 8 minutes. Most pizzas will cook on the grill in about 10 minutes.

When your pizza comes off the grill, top with freshly chopped basil (doesn’t matter what kind of pizza you’re making, the basil will up its wow factor by 100 percent). Every spring, I buy a couple of basil plants at the grocery store and plant them in a pot on my back patio. All summer long, I’ve got lots of basil on hand for pizza, salads, pesto or whatever I’m making.

I’m a little bit in shock that August is just a few days away. It doesn’t seem possible July has come and gone so quickly. I think a few more pizzas on the grill are in order.


May 2024
M T W T F S S
 12345
6789101112
13141516171819
20212223242526
2728293031  

Categories

Archives

Enter your email address to subscribe to this blog and receive notifications of new posts by email.

Join 484 other subscribers