Posts Tagged '#cooking'

Lentil Soup

I was looking through my Kitchen Captivated column archives over the weekend realizing just how much soup I make. It’s for sure my go-to meal. Soup accomplishes several important tasks: generally healthy (as long as its not cream or cheese based), lots of vegetables, one-pot meal and most importantly, its something tasty, comforting and typically the entire family will eat it.

So all that to say, whether it’s vegetable, tomato or chicken noodle, I would say my big orange pot gets put to pretty good use each week.

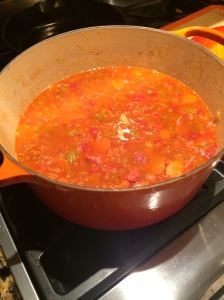
This winter I’ve been making a ton of lentil soup. I wasn’t sure if the kids would like it but they gobble it up. It’s not much to look at, but it is so delicious and hearty and a great meal to help combat the winter blues.

020

Easy Lentil Soup with Ham

  • 1 tablespoon butter
  • 1 tablespoon olive oil
  • 1 medium onion, diced
  • 3 carrots, diced
  • 3 stalks celery, diced
  • 2 cloves of garlic, diced
  • 2 red potatoes, diced
  • 1 28 ounce can of organic diced tomatoes
  • 3/4 cup red lentils (rinsed)
  • 1 pound ham hock
  • 2 boxes organic chicken stock
  • 1/2 bag (2 big handfuls baby spinach)
  • 1 tablespoon honey
  • 2 bay leaves
  • 2 teaspoons thyme
  • splash of balsamic vinegar
  • salt and pepper

In a large pot, heat oil and butter over medium heat. Sauté onion, carrot and celery for 5 minutes until onions are translucent and the veggies start to soften. Salt and pepper. Add garlic and sauté for another minute. Add tomatoes and potatoes. Sauté for an additional five minutes. Add the ham hock, chicken stock, lentils and spices. Salt and pepper. Cover the pot and cook on low for several hours or put into a 300 degree oven for several hours. Stir occasionally. When the ham begins to fall off the bone, your soup is ready. Remove the bone and any fatty pieces of meat. Stir in spinach and cook for an additional 15-20 minutes while spinach wilts a bit. Before serving, remove bay leaves.

You can also use a ham steak in place of a ham hock. Just dice it into bite size pieces.
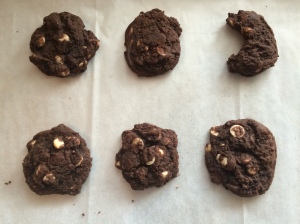
Chocolate Chocolate White Chocolate Cookies

It’s officially February. January is gone for another year (oh thank goodness) and I need a break from green smoothies, salad and constantly feeling hungry.

Besides, February is the month of love and all that mushy stuff and what goes better with romance than a big plate of chocolate goodness? Nothing, I tell you.

Make a double batch of these treats. Trust me. Put some in the freezer. You’ll be so glad you did the next time your husband comes home grumpy from work, or you need a treat to take to a friend or your day just blows up in your face. Not that I would know anything about any of that…

039

This recipe is a bit of a mash-up between a cookie recipe from The Pioneer Woman and The Farm Chicks.

Triple Chocolate Cookies:

  • 2 1/4 cups all-purpose flour
  • 2/3 cup cocoa powder
  • 1 teaspoon baking soda
  • 1/2 teaspoon salt
  • 1 cup unsalted butter, softened
  • 2/3 cup granulated sugar
  • 2/3 cup brown sugar
  • 1 teaspoon vanilla extract
  • 2 large eggs
  • 1 1/2 cups white chocolate chips
  • 1/2 cup semi-sweet or dark chocolate chips

Preheat the oven to 350 degrees. Whisk together flour, cocoa powder, baking soda and salt in a large bowl. In a mixer, cream the butter for 1 minute. Add the sugars and vanilla until creamy and fluffy. Beat in eggs one at a time. Lower the mixer speed to low and gradually add the flour mixture to the butter mixture. With a spatula mix in the chips until well-combined. Bake for about 8 minutes. It’s easy to over-cook the cookies because its hard to tell how brown they are getting. Err on the side of undercooked. Allow to cook on a wire rack and try not to eat a dozen in the first hour you bake them.

Enjoy!

Lemon Vinaigrette

I’ve been making salads like crazy the last couple of weeks. Maybe because its January or because its gray and foggy almost constantly where I live and a big plate of crunchy veggies somehow makes me think of spring. Ok, let’s be real, it’s January and I could use a few more salads and a whole lot less of just about everything else.

I discovered caramelizing sweet onions ahead of time, saving them in the fridge to use throughout the week, after reading Shauna Niequist’s, Bread and Wine and now I can’t get enough.  They are so good in a salad, and now I feel like I HAVE to have them all the time.

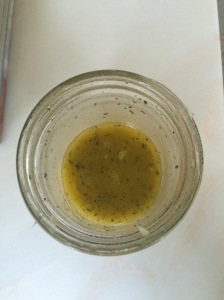
Anyway, this blog isn’t really about onions, it’s actually about the salad dressing. My friend gave me the recipe to a lovely lemon vinaigrette that is bright and acidic, a tiny bit sweet and perfect over greens, veggies and a little goat cheese or feta  (and don’t forget the onions)!

I think the original recipe is from Betty Crocker and as I almost always do, I improvised a little based on what I had. It’s hands down my favorite dressing right now.

109

Lemon Vinaigrette

  • 1/2 cup extra virgin olive oil
  • the juice of one lemon (between 1/4-1/3 cup)
  • 1 tablespoon red wine vinegar
  • 2 teaspoons sugar
  • 1/2 teaspoon salt
  • 1/2 teaspoon ground pepper
  • 1/2 teaspoon Dijon mustard
  • 1/2 teaspoon dried parsley
  • a splash of Worcestershire sauce
  • 1 clove garlic, finely chopped

Combine all the ingredients in a jar with a lid. Shake it up until well combined and store in the fridge for a couple of days.

My favorite salad:

  • baby spinach
  • carrots
  • English cucumber
  • red pepper
  • goat cheese
  • sunflower seeds
  • garlic croutons
  • caramelized onions
  • grilled chicken or turkey deli meat

To make the onions, slice up two large walla walla sweet onions. Heat a cast iron pan over medium heat with 1/2 tablespoon butter and a tiny splash of olive oil. The key with onions is low and slow. As they begin to soften and change color, lower the heat a little and stir often. Salt them halfway through. When they are a nice caramel color, take them off the heat and let them cool. Store in the refrigerator to use all week-long.

Spicy Pulled Pork

Before summer is a distant memory and I have to go digging through my disorganized piles of notes, I need to do a catch-all for a few favorite recipes.

044

Pulled pork so good you eat it cold standing at the refrigerator when you think no one is looking. This recipe always reminds me of my friend Glory and the delicious dinner she brought us years ago when our kitchen was down to the studs. Her sweet and spicy pork inspired this dish and remains to this day one of my favorite meals.

Full recipe HERE.

Which that reminds me, July marked one full year writing my Kitchen Captivated column for Yakima Magazine. It’s one of my favorite projects, I get such a kick out of people telling me they made a recipe and actually liked it.

Here are a few other recipes from the last couple months:

Spring Green Salad inspired by Shauna Niequist’s Green Well Salad

Pasta with Bacon and Brussel Sprouts

The Consummate Chocolate Chip Cookie: a recipe I’ve posted on the blog before

This and That

I wake up on Mondays and think ‘this is the week I’m going to get organized…slow down…set time aside to read, cook, finally build that marble run for Jack…’

HA.

Even though none of that is happening, other really good things ARE.

Game after game of Spot it. Bike riding in the driveway (because we’ve had exactly one skif of snow this year). Chocolate chip cookies. Trying out hot yoga. Attempting to pitch crap from the garage, my closet, the ridiculous amount of toys in the basement.

Just regular life stuff.

I have a regular column in our local magazine and before the archives get so old I can’t reference the recipes anymore, I thought I would link to a few of them:

KitchCapBalsamicBeef-YM-1-311x207

Balsamic Roast Beef

Cinnamon Rolls

Cheese Tortellini Soup (which I think is posted somewhere on the blog already…)


I’m also reading a really good book. Actually, I guess technically I’m re-reading it. It’s called Bread and Wine by Shauna Niequist. I loaned it to a friend and she ended up ordering me a new copy because she splattered so much stuff in her kitchen cooking recipes out of it. The pages are dog eared and starting to stick together. A small group of my girlfriends started a book club/dinner club based on the book and it has been SO fun. We cook the recipes from the book, drink wine, talk late into the evening and even though we are as different from each other on paper as can be, we are finding so many lovely connections.


We had our first lazy weekend in months and I actually woke up this morning refreshed. We went to Lowes and Costco as a family, watched football (go Seahawks!), the boys skied a half day on Sunday and Scarlet and I vacuumed out the car and went to the library. Seriously, it was awesome. We need more of that margin in our life. I know we do and I know I am responsible for creating that space in our family, but it just doesn’t come easily.

If I had any new year’s resolutions this year, it would be to create margin. To learn to say no. To be ok with home and the occasional bout of boredom. To turn off the TV, Instagram, Facebook more often and open a book, the window, my own brain on a regular basis.

So that’s what I’m thinking about these days…more food (duh), more books, more time as a family. Less other (even the good other).

How about you?


Egg Nog French Toast

116

This was a rogue experiment that turned out delightfully delicious. I know not everyone fall into the pro-eggnog camp, but if you do, this is a yummy breakfast to indulge in.

Eggnog French Toast:

  • 4 large eggs
  • 1 1/2 cups light eggnog
  • 1 teaspoon pumpkin pie spice
  • 9-10 slices hearty multi-grain bread

Heat griddle to 325 degrees or a pan to medium heat. Whisk eggs and eggnog together along with 1/2 teaspoon pumpkin pie spice. Soak bread in egg mixture and then place each slice on griddle. Flip after a minute or two until both sides are golden brown. After cooking one side, lightly sprinkle toast with pumpkin pie spice.

Top with butter and (real) maple syrup.

*to be honest, I didn’t measure the eggnog at all, the 1.5 cups is my best guesstimate. Just slowly pour in the milk, whisking until your egg mixture is light yellow.

Homemade Mac and Cheese

This dish is some wicked good comfort food and the perfect antidote to the dark cold fall nights upon us. While this dish certainly falls under the umbrella of ‘every once in a while,’ when it’s served alongside a spinach salad with pears and feta and a big glass of red, you just can’t go wrong.

138

Over the summer while vacationing in Ketchum, Idaho, I stumbled into the cutest little shop. I immediately honed in on the cookbook, Blue Eggs and Yellow Tomatoes by Jeanne Kelly. I had some birthday money burning a hole in my pocket, so the cookbook came home with me. It’s the first cookbook I’ve literally read cover to cover.

Kelly’s recipe for baked ziti with cauliflower and cheese caught my eye the very first time I opened the book, but it wasn’t until just this week that I finally made the dish. I altered a few things based on what was in my kitchen, but seriously, make this dish. It is the perfect fall comfort dinner.

Baked Pasta and Cauliflower with Cheese

  • 4 tablespoons unsalted butter
  • 1 cup chopped onion
  • 2 garlic cloves, minced
  • 1/3 cup all-purpose flour
  • 3 cups cold milk
  • 1 bay leaf
  • 4 ounces shredded parmesan cheese (plus more for sprinkling at the end)
  • 8 ounces Dubliner extra sharp white cheddar, grated
  • 1/2 teaspoon salt
  • 1/4 teaspoon cayenne pepper
  • 1/8 teaspoon grated nutmeg
  • Pepper
  • Salt
  • 1 pound pasta (ziti/rigatoni/shells…whatever you like or have on hand)
  • 1 head cauliflower, cut into florets, florets sliced into bite size pieces
  • 4 slices center cut bacon, cooked, cooled and crumbled
  • 1 tablespoon fresh parsley, chopped

Preheat the oven to 350 degrees and butter a 13 x 9 inch baking dish.

Melt 2 tablespoons butter in a large pot over medium heat. Add the onion and sauté until translucent. Stir in garlic. Add the flour and continue stirring for one minute. Add the milk all at once along with the bay leaf. Cook, whisking the mixture until it comes to a boil and thickens, about 5-8 minutes. Add the cheeses, turn the heat to low and simmer until melted. Stir in salt, cayenne, pepper and nutmeg. Remove the bay leaf and season with pepper to taste.

Boil pasta in a heavily salted pot of rapidly boiling water until almost tender. Add the cauliflower to the pasta and cook until cauliflower is barely tender, about 4 minutes. Drain very well and stir drained pasta and cauliflower into the cheese sauce.

Transfer the pasta mixture to the baking dish. Sprinkle with crumbled bacon, fresh parsley and a handful of parmesan cheese. Sprinkle with salt. Cover with foil and bake for 20 minutes. Uncover the last five minutes to let the edges brown slightly and make sure the cheese is boiling.


Scarlet gave this meal a hearty two thumbs up. She has subsequently been eating it now for three days straight. Aaron and I both stood at the stove and ate second helpings straight from the pan. The boys ate it but didn’t rave. I’m choosing to ignore their neutrality.


Blueberry Hand Pies

I started this post out with a very whiny tirade on sick kids who don’t sleep. But nobody wants to hear about that and quite honestly, anybody who’s been in a ten foot radius of me in the last month has heard all about it.

So…time for a topic change and hopefully with that, an attitude change! Hurray!

260

I am in love with hand pies. I love pie, but often my crust to fruit ratio is off. Most of the time the filling is runny and the bottom crust is soggy. For me, it’s just tricky.

But the hand pie is different. The smaller scale somehow makes everything work a little better. No soggy crust, no runny filling. Just sweet, tart, amazing blueberry filling wrapped in a buttery, flaky decadent crust. I’ve made these a couple of times now and while they may not LOOK amazing, they taste incredible. (Also hello portion control. You can make them as big or small as you like.)

Recipe is HERE. I highly recommend making this dessert with whatever fruit you have on hand. I happened upon some blackberry bushes yesterday and I think I might have some hand pies in my future this weekend.

Kitchen Captivated

I think I’ve professed my love for cooking and eating enough times on this blog that you all know that I like to…well…cook and eat. All that cooking and eating opened a fun little door and I’m now writing a regular column for a local magazine in my hometown. It’s small potatoes for sure, but it’s a fun project for me that I’m really excited about.

My first column was published a couple of weeks ago and I wrote about my newish obsession with grilling pizza. Seriously, it’s the best.

So, if you have a minute, check out my column here and the next time you’re in the mood for pizza, try this recipe:

080

Pizza Dough

  • 1 cup warm water
  • 1 ½ tablespoons honey
  • 2 tablespoons olive oil
  • 1 ½ teaspoons salt
  • 2 2/3 cup bread flour
  • ½ cup whole wheat pastry flour (can be swapped for bread flour)
  • 2 teaspoons dry active yeast (or one packet of yeast)

Combine flour and salt in a small bowl. In a separate bowl, dissolve yeast in water. Let stand for a few minutes while the yeast activates. The yeast is ready when it gets frothy and bubbly. Add dry ingredients, oil and honey. Stir the dough until ingredients combine, then knead on lightly floured board until smooth and elastic (about 8-10 minutes). Form the dough into a ball and place in a greased bowl. Cover the bowl and let rise until doubled in size (about an hour).  Divide the dough in half and using a rolling-pin, form the dough into two 12-inch circles.

My most favorite toppings are simply garden tomatoes, fresh basil, a little garlic and mozzarella. Nothing beats that combination and on the grill, the tomatoes soften and roast perfectly.

To cook your pizza, heat your barbecue to 500 degrees. Use a pizza stone or pizza pan to cook your pizza. You can use a cookie sheet, but it doesn’t work as well. You can also cook your pizza directly on the grill. Simply place your rolled-out dough directly on the grill, cook on one side for about 2 to 3 minutes, flip, add your toppings and finish cooking for an additional 5 to 8 minutes. Most pizzas will cook on the grill in about 10 minutes.

When your pizza comes off the grill, top with freshly chopped basil (doesn’t matter what kind of pizza you’re making, the basil will up its wow factor by 100 percent). Every spring, I buy a couple of basil plants at the grocery store and plant them in a pot on my back patio. All summer long, I’ve got lots of basil on hand for pizza, salads, pesto or whatever I’m making.

I’m a little bit in shock that August is just a few days away. It doesn’t seem possible July has come and gone so quickly. I think a few more pizzas on the grill are in order.

Zucchini Bread

My sad little zucchini plant sat wilted and small in the corner of my garden this year. I almost gave up on the thing until finally in the last couple of weeks, he’s made a comeback. I’ve never met a zucchini plant that didn’t want to grow.

And grow and grow and grow.

That corner of the garden is now taken over by a zucchini plant that’s taller than Luke and pumping out giant squash nearly every day.

This means I once again buy flour and sugar in bulk and my oven works its tail off baking zucchini bread almost every day. Last summer I think I ended up storing 20 loaves in my freezer and I’m sure it will happen again this year.

My mom’s recipe has always been by far my favorite and yet I never asked her for it. I just waited until she took pity on me and shared what she had made. This year, I finally wised up, got the recipe and now it’s the only recipe I make.

319

Mom’s Zucchini Bread

(adapted from a recipe from the Spokesman Review…probably from the late 1980’s????)

  • 3 eggs
  • 1 cup canola oil
  • 2 cups sugar
  • 2 cups shredded zucchini
  • 1 tablespoon vanilla
  • 3 cups all-purpose flour, sifted
  • 1 teaspoon salt
  • 1 teaspoon baking soda
  • 1/2 teaspoon baking powder
  • 1 tablespoon cinnamon
  • 1 cup chopped walnuts, chopped

Preheat oven to 350 degrees. Line bread pan with parchment paper or coat it in cooking spray. Beat eggs and oil for 2-3 minutes until creamy. Add sugar and mix well. Add zucchini and vanilla. In a separate bowl, mix together all dry ingredients. Slowly combine dry ingredients with wet ingredients. Do NOT over mix! Add in chopped walnuts. Pour batter into bread pan and bake for at least one hour, until a toothpick stuck into the center of the bread comes out clean.

A couple of quick notes:

Bake the bread in ONE large bread pan. I don’t know why, but this makes a difference. The top of the bread forms a slightly crispy crust, making it so delicious. For some reason, when the dough is divided, it doesn’t do this.

I typically add an extra 1/2 cup of zucchini. It takes the bread a few extra minutes to cook, but I feel like the bread stays moist an extra day.

If the bread is getting too dark on top but it’s not finished cooking, fold a piece of tin foil in half and create a little ‘tent’ to cover the bread. It will continue cooking but the top won’t get overly brown.

Add chocolate chips, blueberries or other kinds of nuts. Do NOT add whole wheat flour, flax-seed or bran flakes. This significantly changes the texture and taste of the bread (I tried, I was very sad with the results). It’s a treat, not health food.

Enjoy!


May 2024
M T W T F S S
 12345
6789101112
13141516171819
20212223242526
2728293031  

Categories

Archives

Enter your email address to subscribe to this blog and receive notifications of new posts by email.

Join 484 other subscribers